If you've been tasked with creating a site plan for a building or house but aren't sure how to draw a site plan, you're not alone. If that's the case, this article is for you.
Successful projects are accomplished with a solid foundation that involves a coherent site plan, providing an overview of a property or land. A site plan is important for adequate planning and management on a construction site.
Drawing a site plan may seem difficult initially, but with the proper guidance, it can be a straightforward and essential part of the construction process. We will get you through the steps to create a comprehensive and accurate site plan, making the process easier than you might think.
In this article
What Are Site Plans?
Site plans are the 2D aerial construction drawings used by architects, contractors, engineers, and builders to identify improvements on a site. These are graphical representations of a map plot of a house or building, consisting of building dimensions, location, size, and boundaries.
Site plans are crucial for proper project management, development, and planning on a construction site. They provide a bird's-eye view to visualize the project site, helping architects and engineers optimize the available area through strategic structural planning, utility placement, and landscaping elements while maximizing open spaces and amenities.
Moreover, the site plan is important because it facilitates collaboration between the surveyor, designer, and engineer by providing a single reference point for construction purposes. It gives an idea of how the structure can be utilized most effectively and helps contractors and engineers minimize waste by allocating resources efficiently.
How To Make a Site Plan
Creating a site plan requires careful planning and attention to detail about dimensions and scaling. Follow the steps to make a site plan that is functional and accurate.
Prepare and Gather Information
A site plan involves dimensions, buildings, utilities, restrictions, and zoning. These are critical information which are involved in creating a site plan. Therefore, gathering accurate data is indispensable. The first step is to determine the purpose of the site plan, whether it is residential, building, or industrial.
Perform a topographic survey of the construction site. Identify the area and property limit, reviewing utility maps to locate existing water, gas, sewer, and electrical connections. In addition, gather necessary tools such as a pencil, scale, eraser, and graph paper if you prefer to sketch a site plan.
Utilize GIS Resources
Before creating a site plan for a construction site, it is crucial to verify its property line. You can use local GIS tools and resources provided on the internet to identify the property lines. You can easily find government-related GIS resources online or use ArcGIS online software. Here is the screenshot of the GIS location of my area on ArcGIS software.
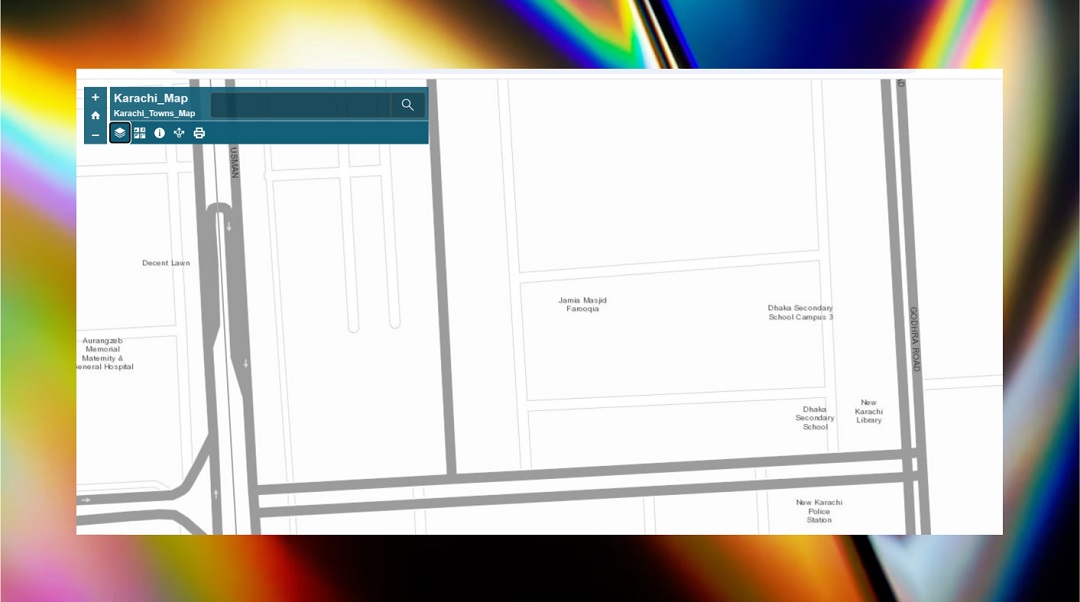
So, how do you use it? We can see a search bar in the top right corner of the screenshot. That is my city and address, which I've provided. Search for your City GIS map on Google, and local government GIS maps will appear. Find your desired construction site map location by searching the name of the nearest town or colony.

Leverage Advance Tools
Leveraging the right tools to create a site plan and streamline the process is essential. Tools like Computer-Aided Design software such as AutoCAD, SketchUp, and Revit. AutoCAD is the most used by architects, engineers, and designers for 2D planning. SketchUp is mostly preferred for 3D planning to view the site plan in different dimensions and engaging visualization.
Manually Draw a Site Plan
To draw the site plan manually, you must have some tools such as graph paper, a sketch pencil, a ruler, a compass, a protractor, measuring tape, and a triangle. These are common geometric items.
Follow these steps to draw a site plan manually:
- Measure the site: Start by measuring the site with tools such as measuring tape, GPS devices, and laser tools.
- Scale the graph paper: Select a scale that fits your graph paper. The common scale is 1 10, which means 1 inch is equal to 10 feet.
- Draw property lines: Draw the construction area's property lines from your collected data.
- Add Properties: Draw the surrounding properties outside of the property line. Mention the roads and highlight other properties. Make sure they are all properly scaled.
- Add a north arrow and legend: Include a north arrow to help orient the site plan and a legend to clarify the meaning of any symbols and line types used in your drawing. These elements enhance clarity and make the plan easier to understand.
- Final Revision: Do the final revision before finalizing the site plan. Ensure every utility is placed in the right area for electricity, sewage, and water lines. Take suggestions from experienced co-workers in your team for revisions.
Make One Yourself Online For Free on Edraw.AI
Edraw.AI is a robust AI visualization tool collaborating with over 40+ AI tools. It has over 700 customizable templates, 210 diagram types, and 26,0000+ icons & symbols. The AI tool helps users to create site plans, floor plans, diagrams, charts, and flowcharts. In addition, you can collaborate with teammates to work on the same file using Edraw.AI collaboration tools. There are different methods of creating a site plan on Edraw. AI. Let's check them out.
Method 1: Starting a Template
Customizing a template will help you save time and money simultaneously. Make sure to create an account before starting!
If you can not find a template that fits your needs, you can easily import templates on Edraw.AI in different formats, such as Visio, Word, Edrawmax, JPEG, PDF, and more.

Step 1 Import a Template
On the Edraw.AI homepage, click on the New > Import a File
Note: I prefer downloading an Edrawmax template and importing it to Edraw.AI as it more easier to edit and work.
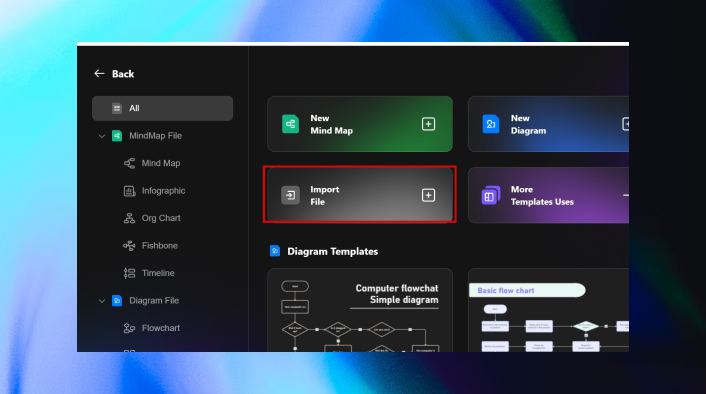
You can see I've already imported a site plan from Edrawmax. You can easily download it from Edrawmax Template Community and import it on Edraw. AI.

Step 2 Edit the Template
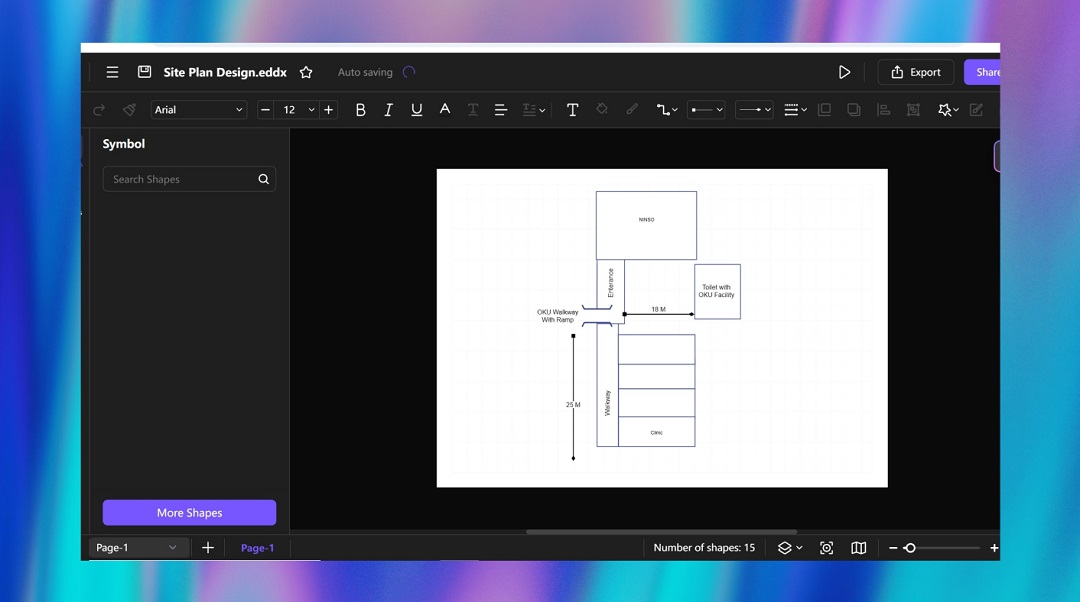
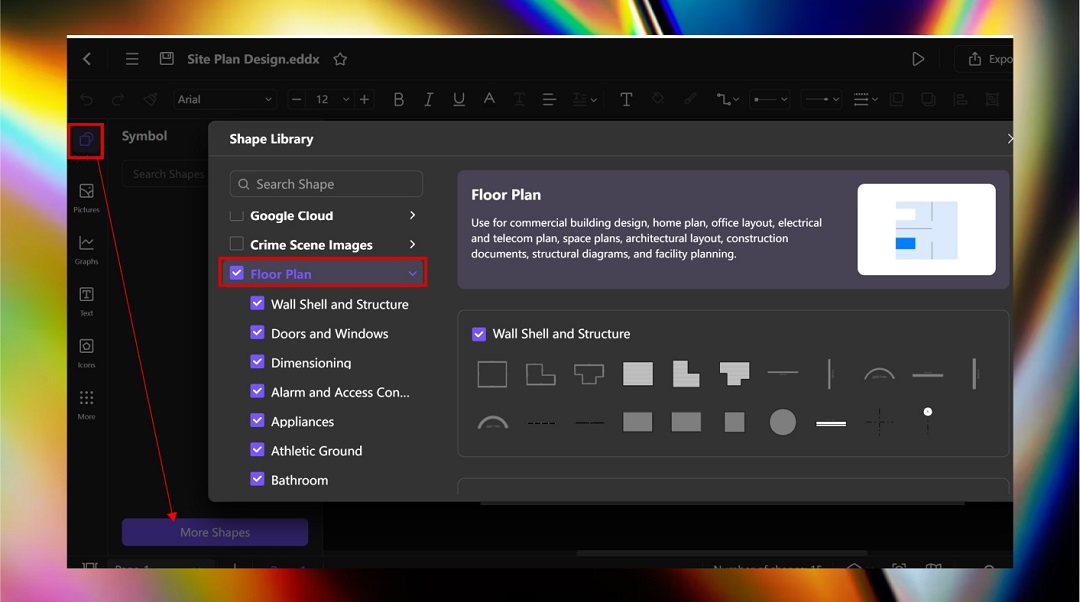
If you do not see any symbols for implementation, select Symbol on the top left > More Shapes and tick the Floor Plan. It will enable floor plan symbols.
Add different symbols, pictures, and themes according to your personalization. You can also customize the symbols with precise settings.
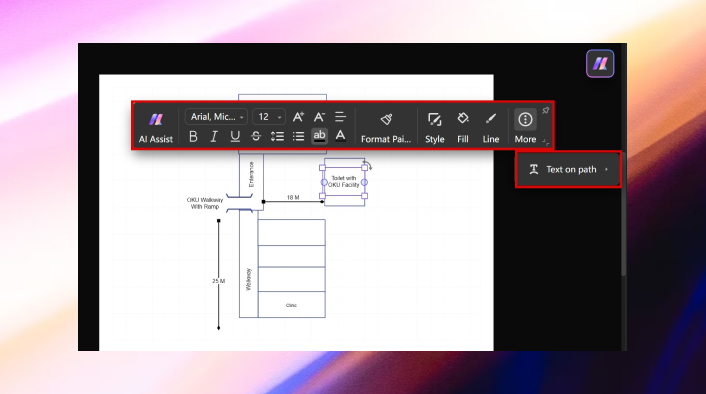
Click on any symbol on the site plan and change the style, paint, width, and add text.
Step 3 Share and Export
Once done, you can share your work with other team members by clicking Share in the top right corner. You can copy the link to share or add your team members' email for collaboration.

Finally, the diagram can be exported in different formats such as Visio, Word, SVG, Excel, PDF, EDDX, and PNG.

Method 2: Start from Scratch
Step 1 Select the Graph
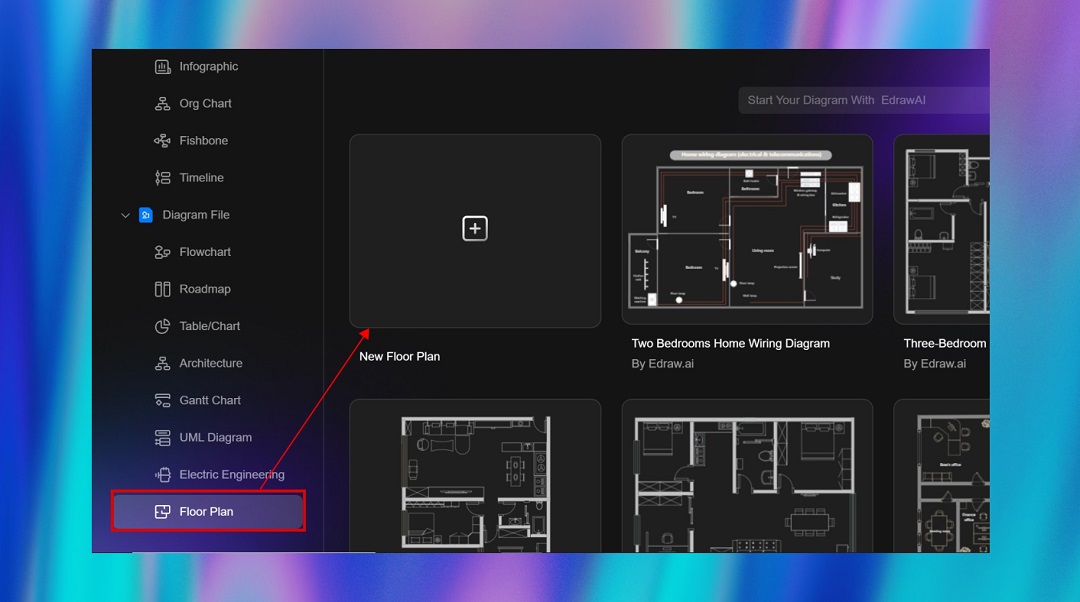
Select New > Floor Plan > New Floor Plan to create a site plan from scratch.
Step 2 Create Property Lines
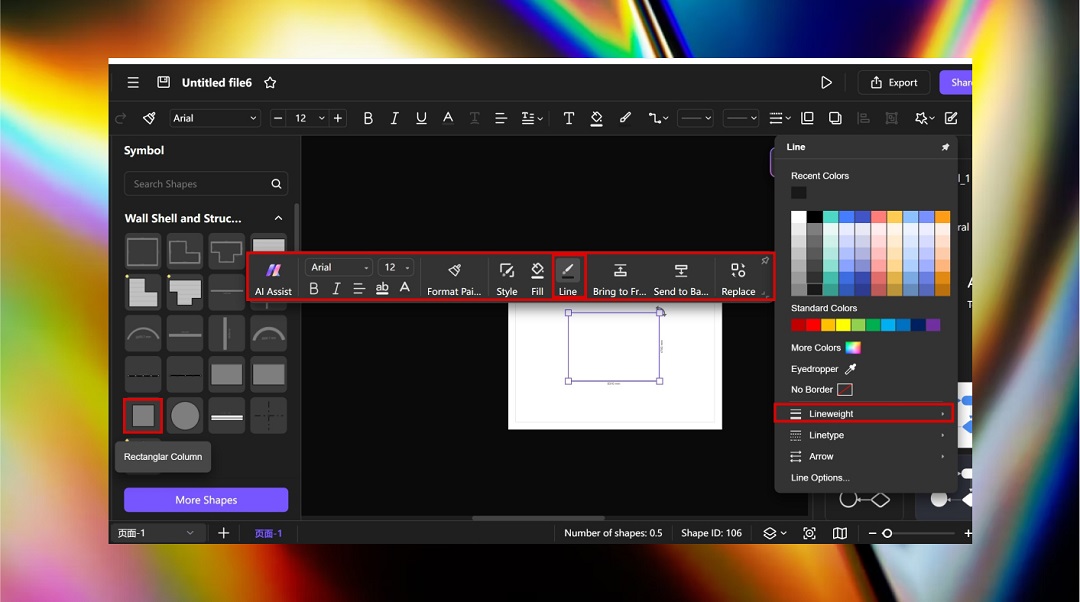
Add a rectangular column from the symbol library and change the line weight using the precise settings. It will make it more visible. Change it to 1.50 PT.
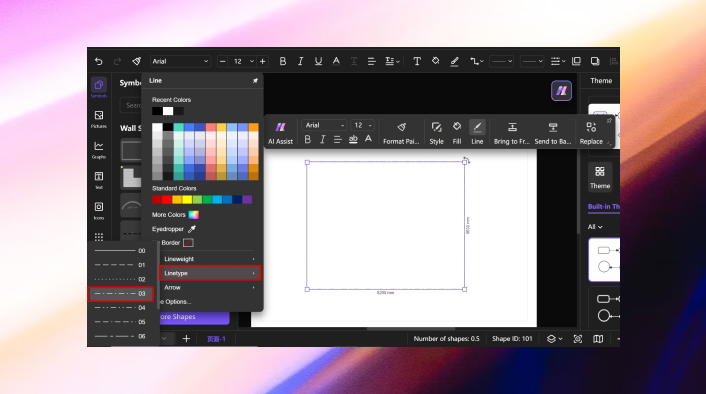
Stretch it and change the line type to dotted to make the property line of the site plan.
Step 3 Add Properties
Add different properties of the surroundings using symbols. Add buildings, walk bypass, and provide a label.
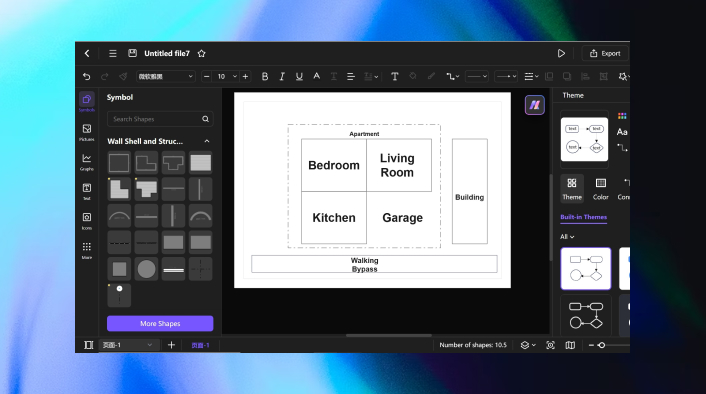
Easily export, share, and download the file. This was just an example. Creating a site plan requires you to survey and collect important notes.
Site Plan Examples
Let's understand site plans with some examples.
Residential Site Plan
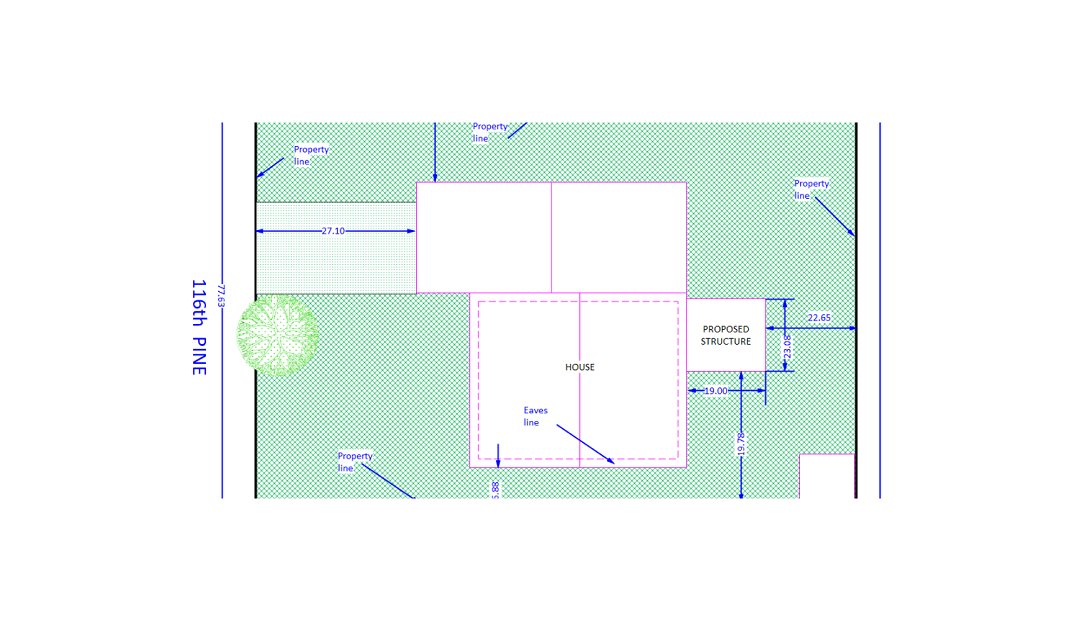
This site plan depicts a site plan for a residential property. Residential properties are houses or apartments. It is a basic site plan that covers all the basic aspects of a site plan. The site plan examples properly describe the site's property line and showcase the proposed structure.
In a nutshell, this site plan provides a basic overview of the proposed house location within the property boundaries. It gives us a sense of the size and positioning of the house relative to the property lines.
Construction Site Plan
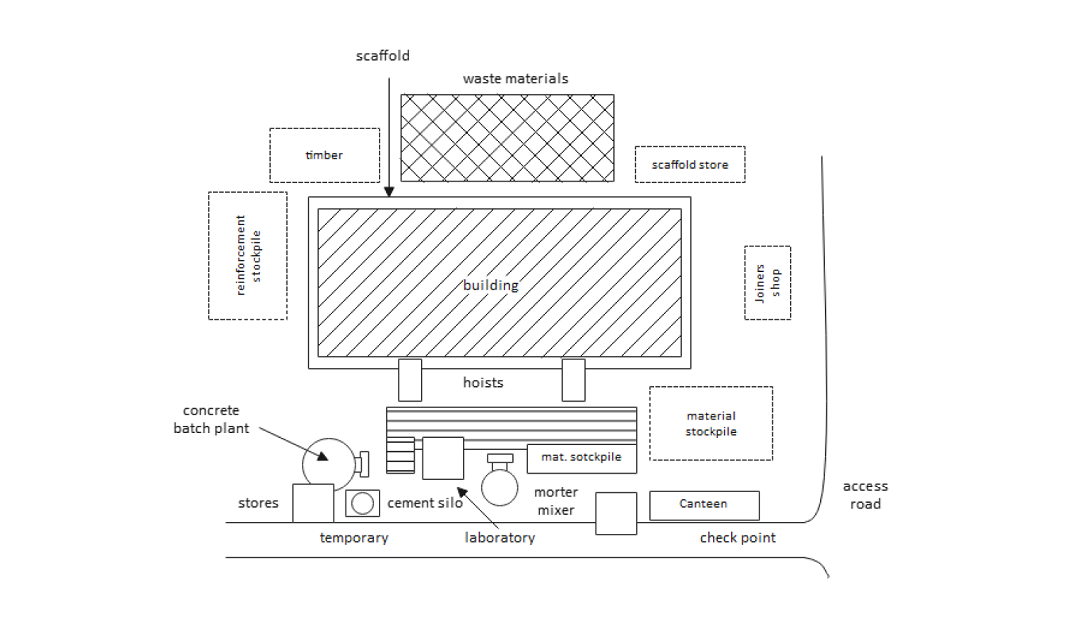
This is an ideal site plan example for the construction of a building. The site plan features scaffolding, providing temporary support and laborers access. It showcases areas for different purposes, such as the cement silo used to store cement for concrete production, a scaffold store for storing extra materials, and a concrete batch plant for mixing concrete ingredients.
Overall, this site plan offers a clear snapshot of the construction site layout, highlighting key components and organization. It helps visualize how different areas are arranged and how materials move efficiently throughout the site.
Event-Related Site Plan
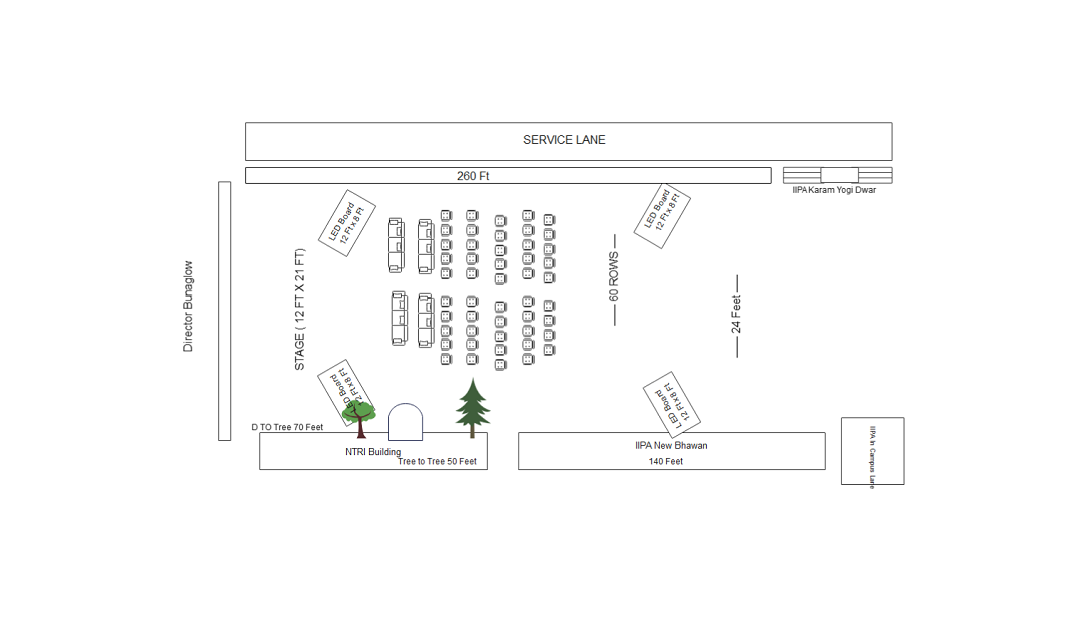
This is a prime example of an event site plan drawing. The site plan depicts a grand stage with vast expanse of sitting for the guests. It showcases the dimensions of the surrounding buildings. Two majestic trees, nestled behind the stage, add a touch of natural elegance.
The site plan helps architects and designers understand the flow of the event and the relationship between the stage and the audience.
Difference Between a Site Plan and a Floor Plan
The site and floor plan are both orthographic projection drawings. However, they are not the same. Most of the individuals consider them the same. Here is the major comparison between the site plan and the floor plan.
1. Viewpoint
The primary difference is the viewpoint of both plans. A site plan presents a bird-eye view of a property. It showcases surrounding properties, trees, orientation of a building, and landscaping and proposes the main building structure.
Conversely, a floor plan depicts a top view of the layout. It showcases interior rooms such as bedrooms, bathrooms, and living rooms. The exterior structure and neighboring buildings are not involved in a floor plan.
2. Purpose
Both the Site and floor plans have different purposes. The primary purpose of creating a site plan is to focus on buildings beyond the plot and provide a detailed overview of the architectural structures.
While a floor plan shows interior objects and focuses on the inside view of the layout, it helps visualize and plan interior spaces' functional use and relationships.
3. Objects Shown
A floor plan typically showcases objects such as counters, tabletops, beds, fixtures, cabinets, etc. In contrast, a site plan depicts trees, pathways, roads, and buildings surrounding the main structure site.
Both site and floor plans are crucial in a successful project in the construction and architectural industry.
Conclusion
Creating a site plan requires understanding the plot, zones, and structures. It is important to survey the site before creating a plan. We have mentioned a traditional and a smart way of creating a site plan. Edraw.AI provides a quicker and more efficient way to make site plans with hundreds of functionalities.


