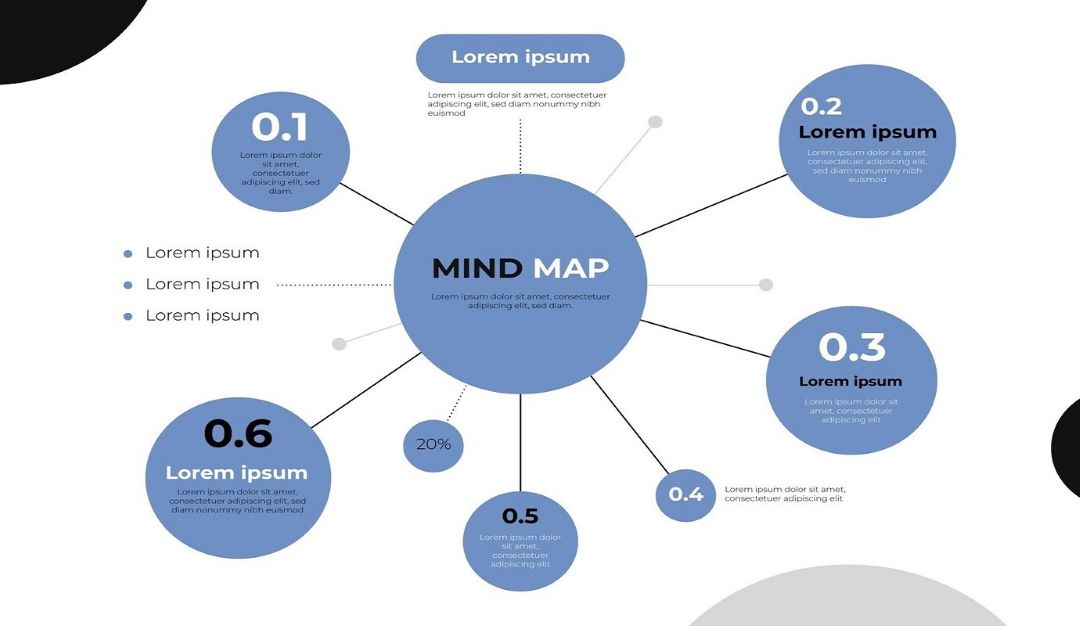
Mind maps are important tools for organizing information. You can use it during brainstorming sessions, project planning, or breaking down complex concepts. PowerPoint, commonly known for presentations, offers tools to create engaging mind maps in seconds.
This guide will take you through easy steps for making both basic and professional mind maps. Read on for more tips to improve visual appeal and efficiency.
In this article
How To Make a Basic Mind Map in Microsoft PowerPoint?
Making a basic mind map in PowerPoint is easy. Here’s a guide to help you make a clean and simple mind map using PowerPoint:
Step 1: Open a Template
There are two ways to access SmartArt or Chart templates in PowerPoint:
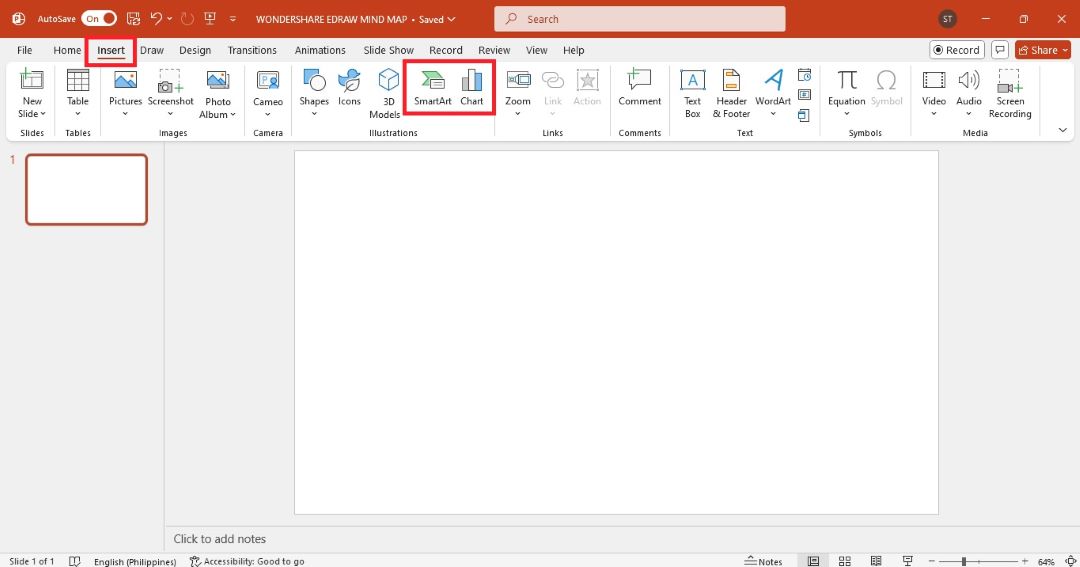
- Launch MS PowerPoint and open a new blank slide. Go to the Insert tab in the top navigation menu. Then, select SmartArt or Chart in the Illustrations group.
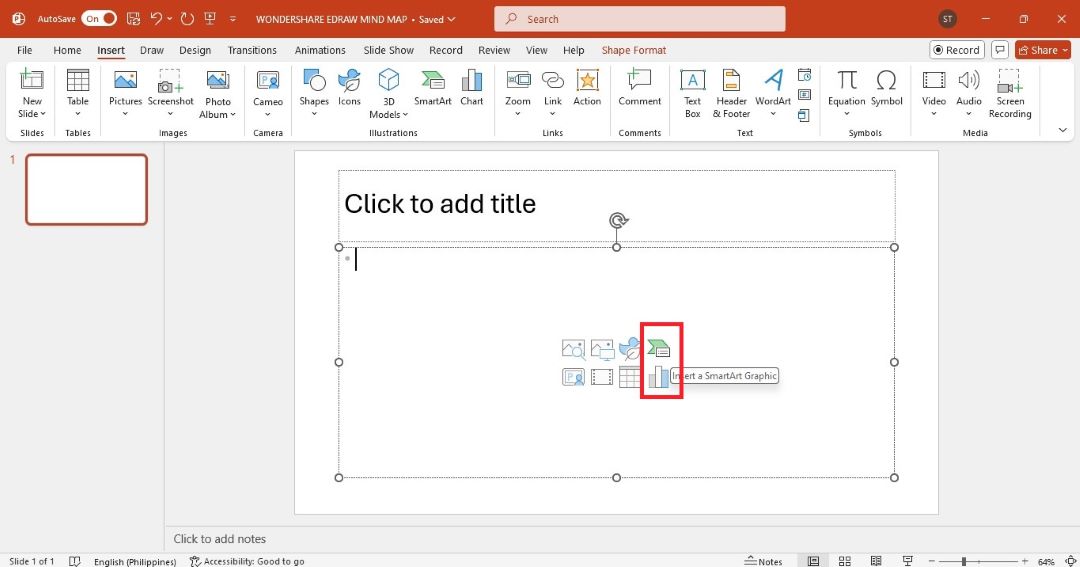
- Click Insert on the upper navigation pane, then click New Slide dropdown menu. Select the Title and Content PowerPoint slide layout. In the middle of the slide, you will see several icons, including one for SmartArt and one for Chart.
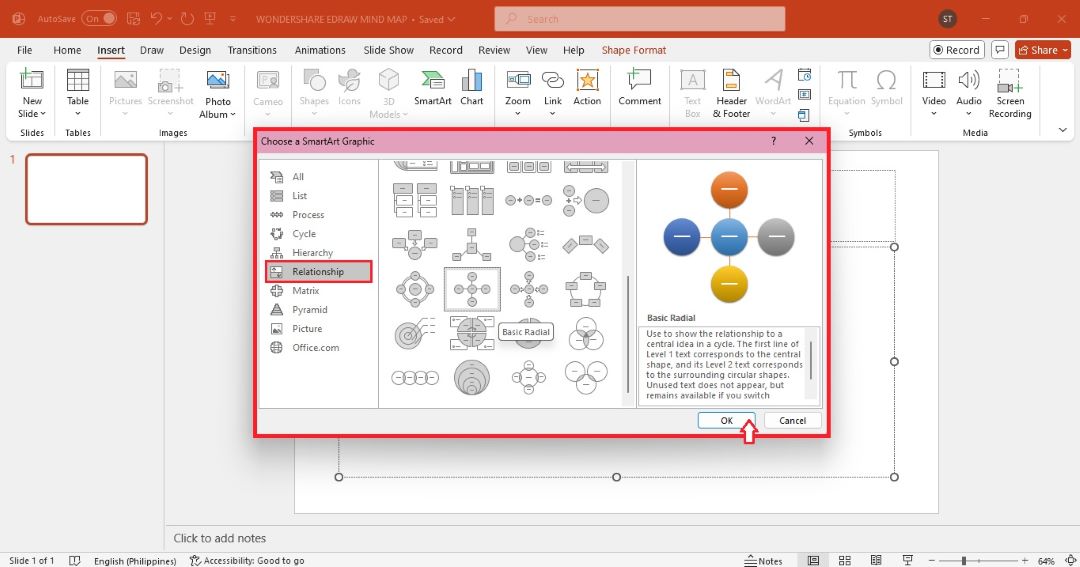
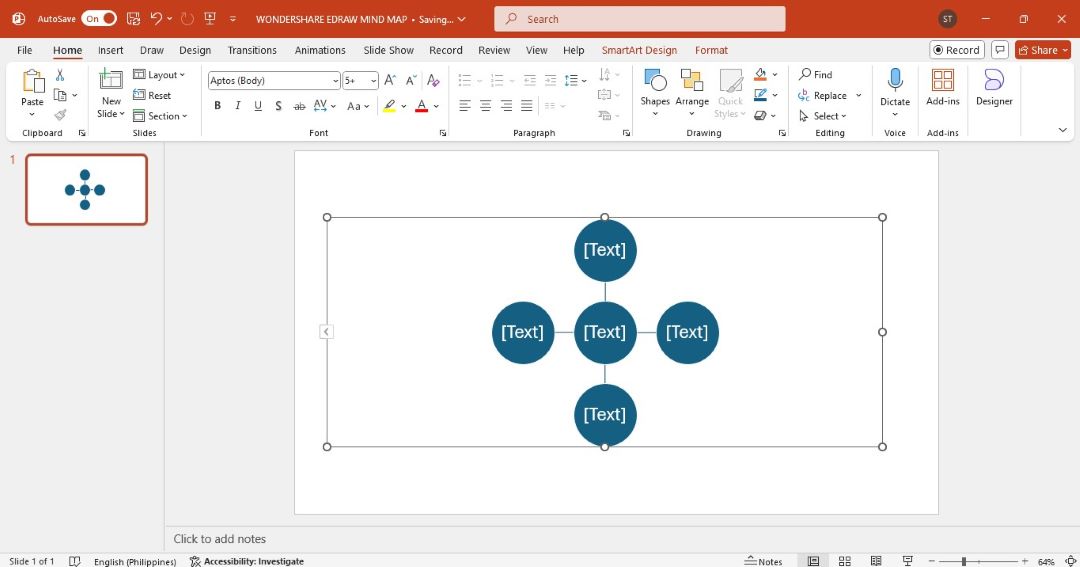
Select SmartArt to open a gallery of templates from which to choose. On the Choose a SmartArt Graphic pop-up window, go to the Relationship category. Select a diagram template, such as Basic Radial, and then click OK.
You will see the mind map template on the slide after you select one.
Step 2: Edit Text
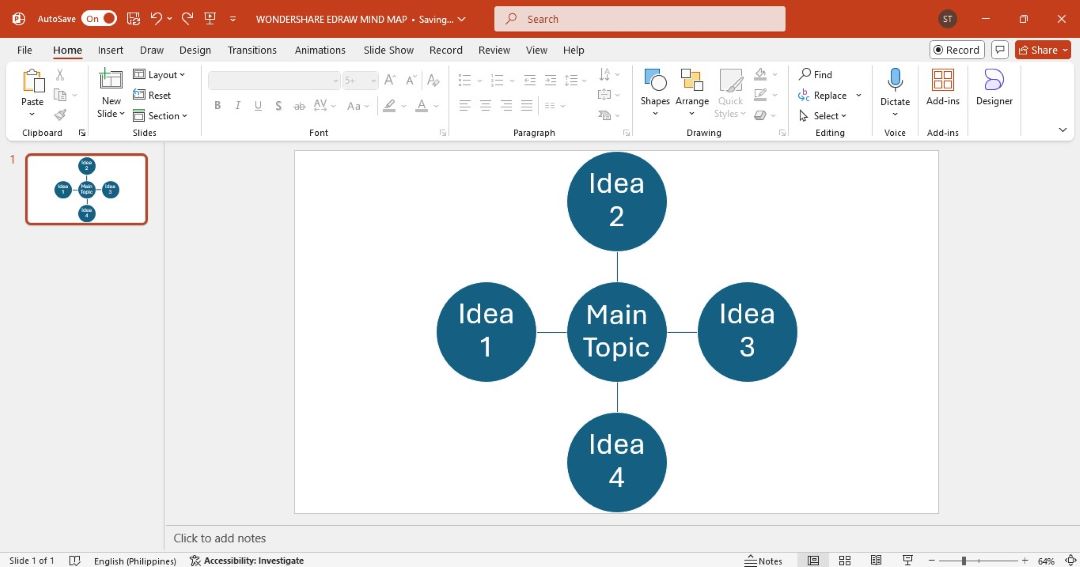
Click any of the text boxes within the diagram to enter the details you want.
Step 3: Remove or Add Shapes
Add or remove shapes to customize your mind map diagram.
Add a Shape
There are several ways to add a shape to the mind map template:
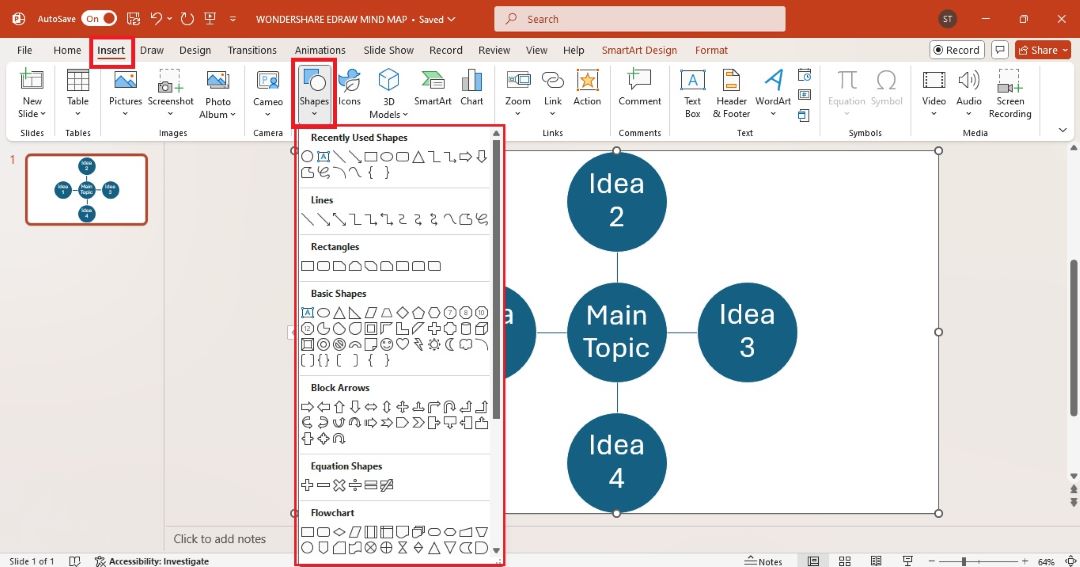
- Go to the Insert tab in the top menu. Click the hapesS dropdown menu and choose the shape you want. Use your cursor to draw the shape on the slide.
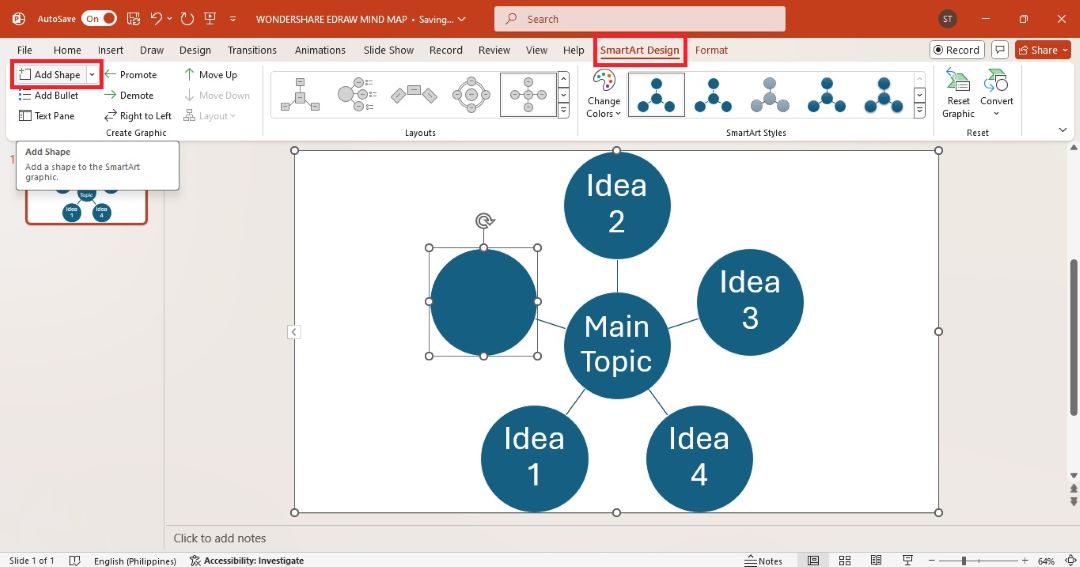
- Click the SmartArt diagram. In the SmartArt Design tab, click Add Shape on the top-left side to insert a new shape within the diagram.
- Click Text Pane from the SmartArt Design tab. Add text to create a new item for your diagram.
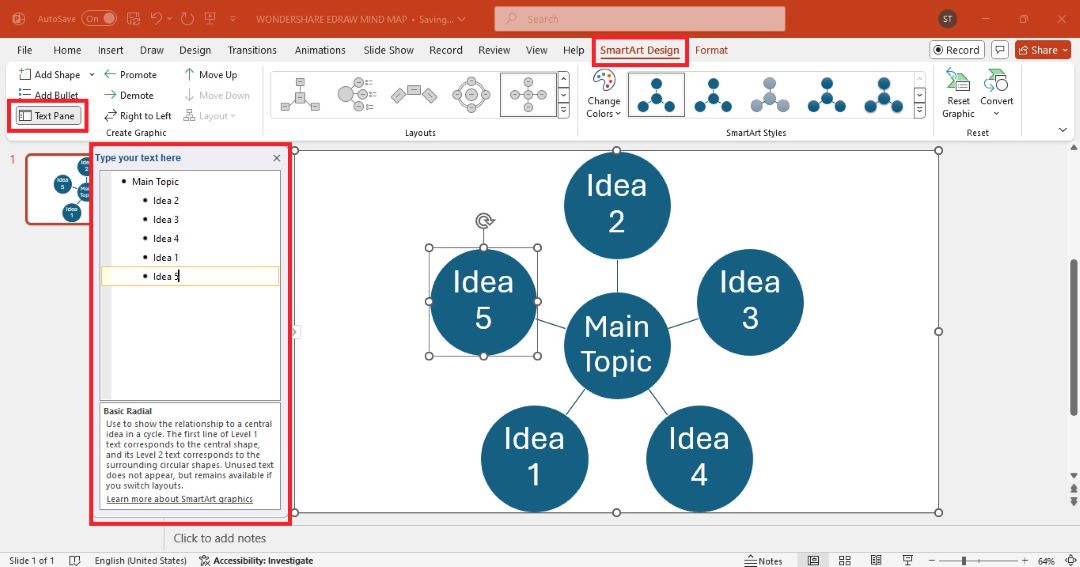
- Right-click any shape in the diagram. Select Copy, and then paste it where needed.
Remove a Shape
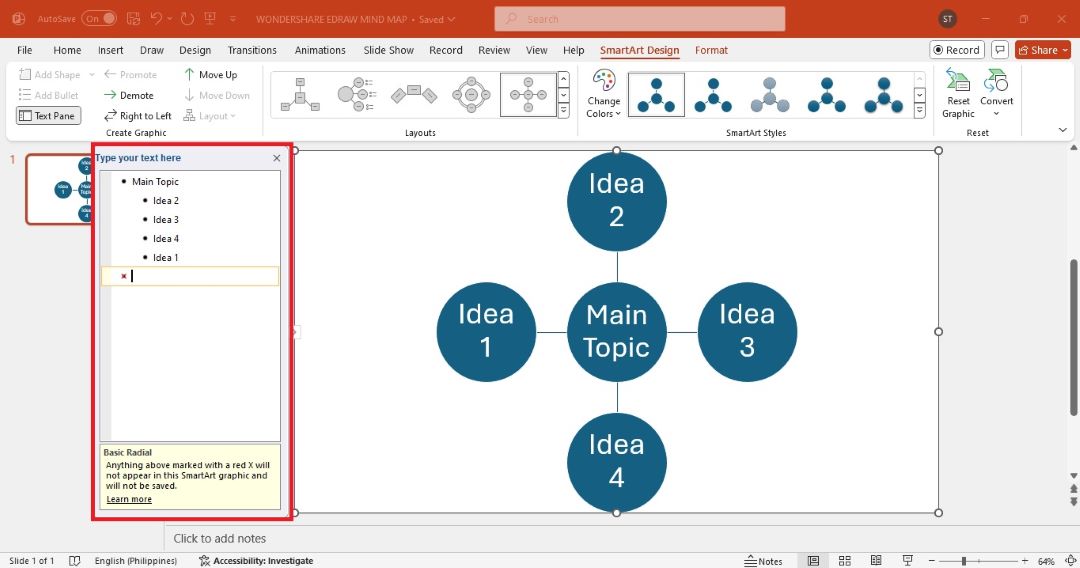
Select any shape or text box you don’t need and press the Delete key on your keyboard. loading="lazy" alternatively, delete the text in the text pane on the left side of the diagram.
Step 4: Change Style
Here are three ways to personalize your mind map. You can customize it using the Format menu, the floating toolbar, and one-click changes. Here’s how you can do it step-by-step:
Method 1: Format Menu
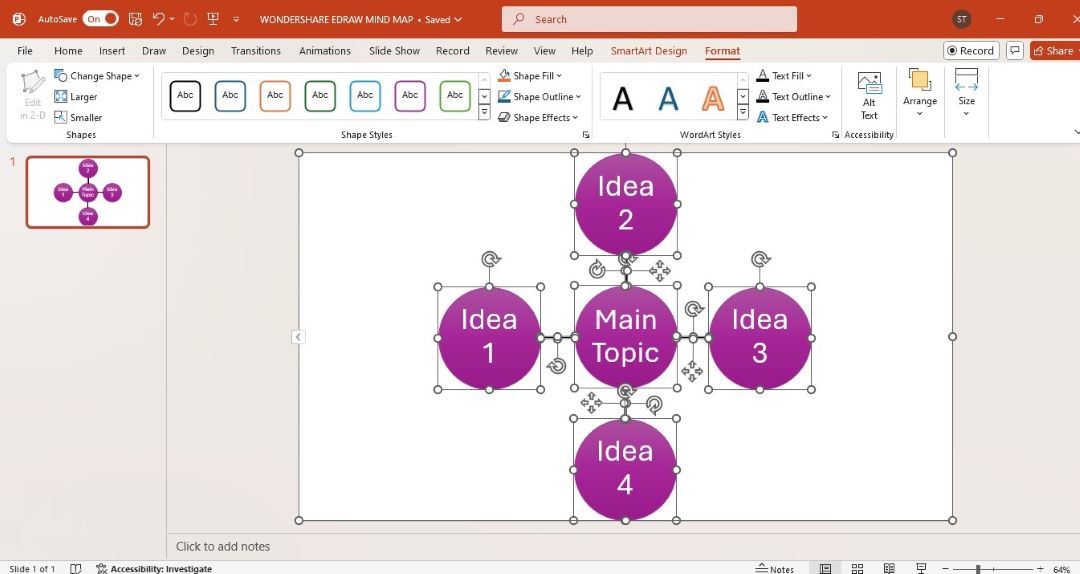
- Select the shape, text box, or entire diagram. Go to the Format tab in the upper navigation pane. Click Shape Fill to choose a different color for the selected shape.
- Select Text Fill to change the color of your text.
- Use Text Effects to add shadows or glowing effects.
Method 2: Floating Toolbar
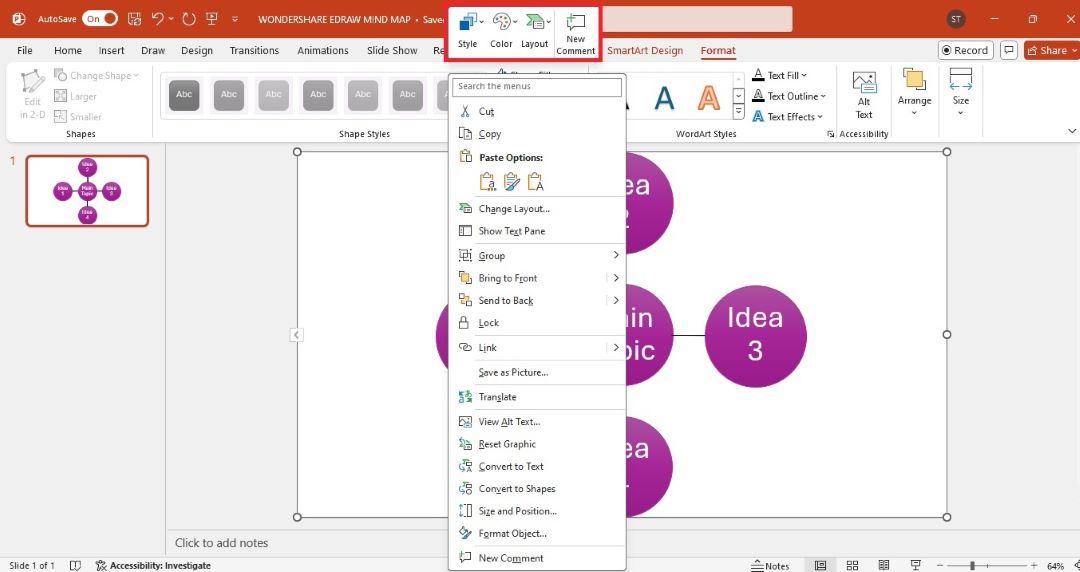
Right-click any shape in the diagram. You will see a floating toolbar appear above. Use the options in this toolbar to quickly adjust the Style, Color, or Layout of the mind map.
Method 3: One-Click Change
Select the mind map in the slide, then go to the SmartArt Design tab. From there, you can try different styles with just one click. MS PowerPoint makes it easy to instantly update the look to match your presentation style.
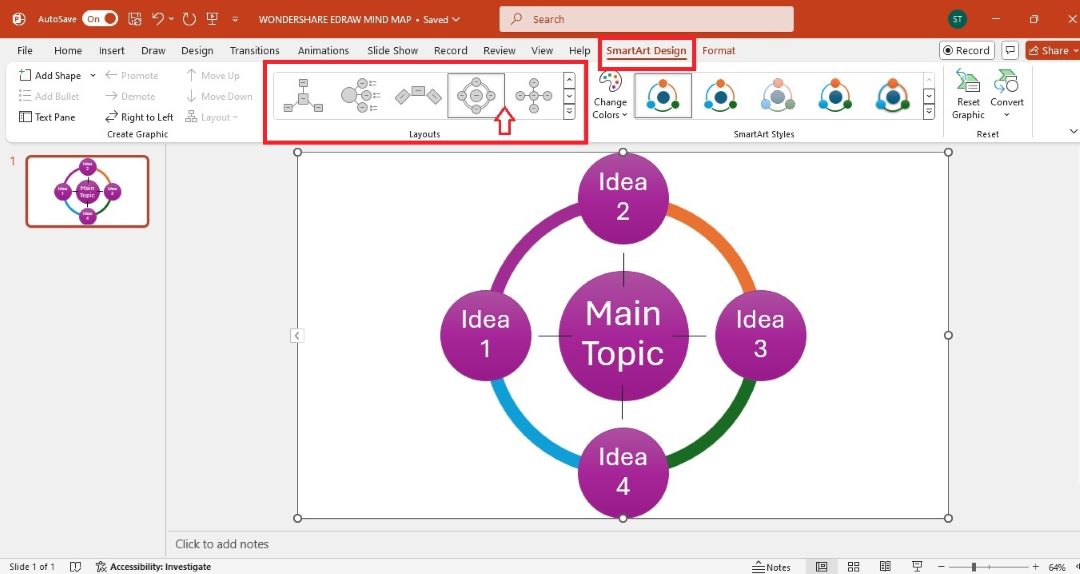
One-Click Layout Change
Select a design for the mind map from the Layouts group for an instant layout change.
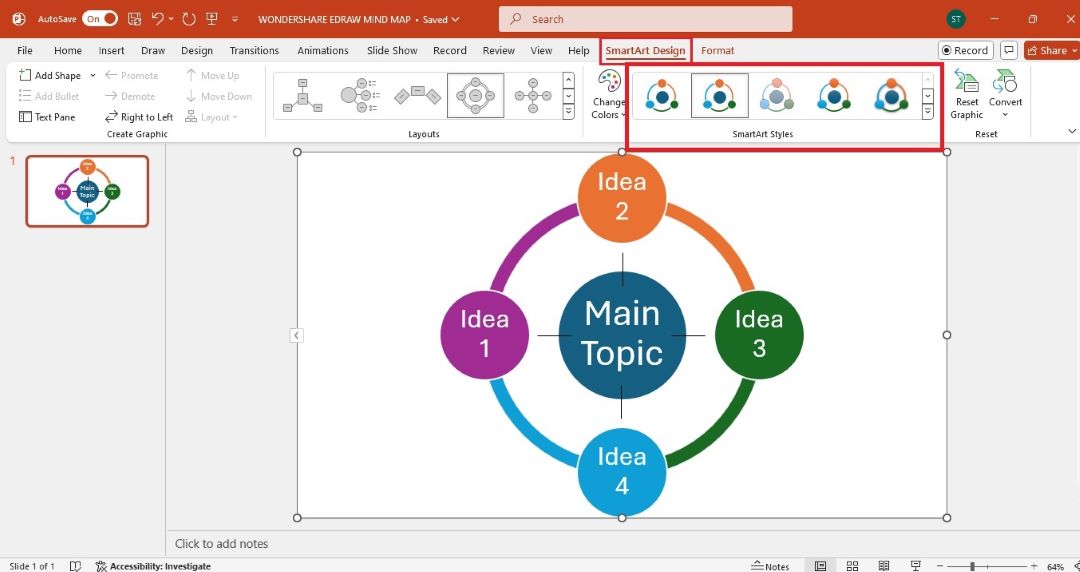
One-Click Style Change
In the SmartArt Styles group, choose one of the pre-made styles to apply on the mind map.
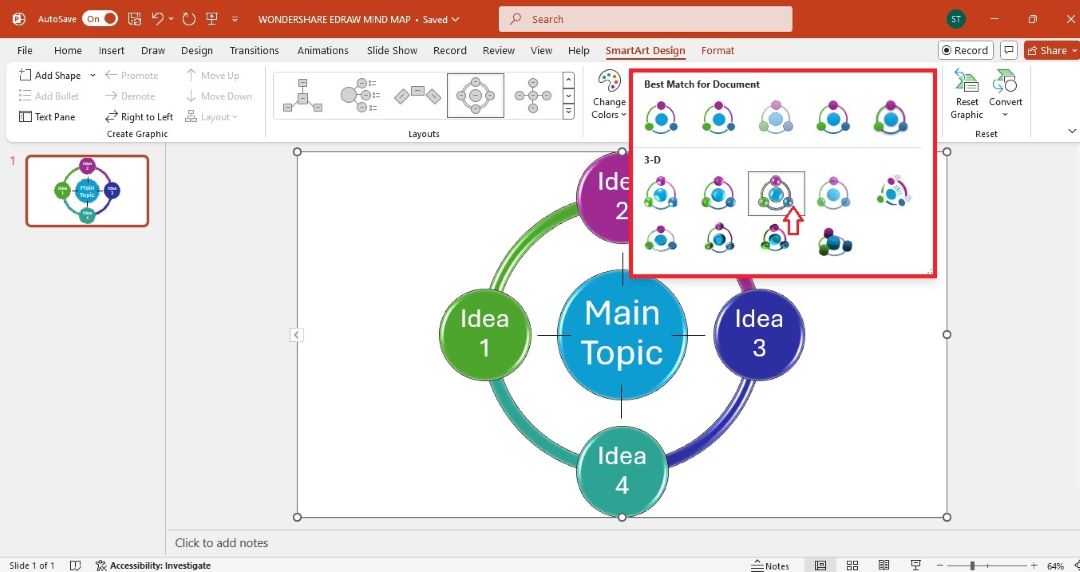
Click the up and down arrow buttons on the SmartArt Styles group to view more quick styles, including 3D.
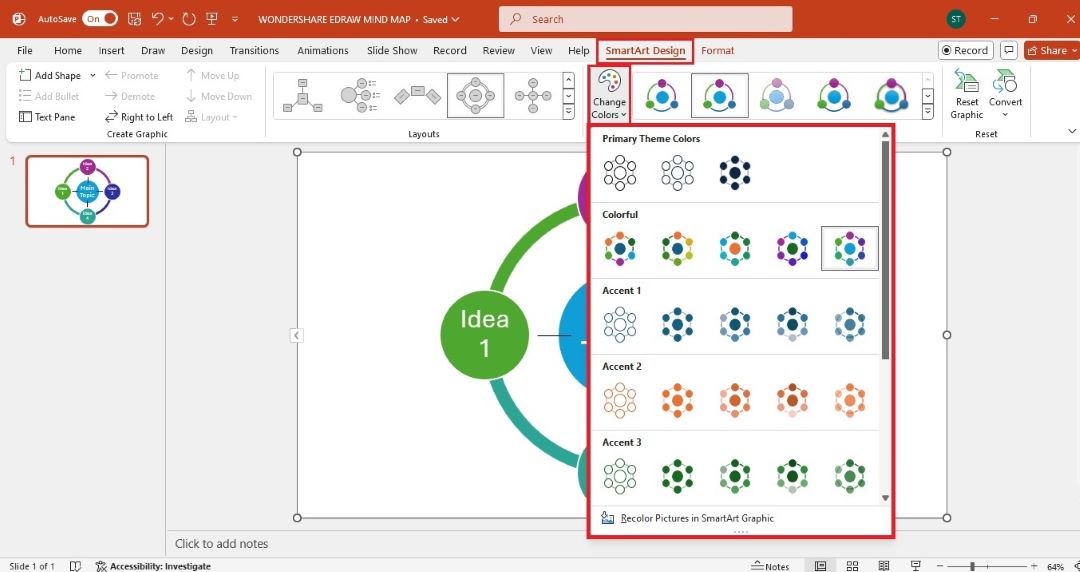
One-Click Color Change
Select a color accent or theme from the Change Colors dropdown menu to apply a new color scheme to the mind map.
How To Make a Professional Mind Map in PowerPoint?
Creating a professional mind map in PowerPoint involves more than using templates. You’ll need to craft your map with attention to detail in structure, style, and design. Follow these 12 steps to make a well-designed, professional mind map:
Step 1
Create a new slide. Choose a blank layout to begin.
Step 2
Go to the Insert tab and click Shapes. Choose a circle or rectangle for the central theme of your mind map. Place it in the middle of the slide.
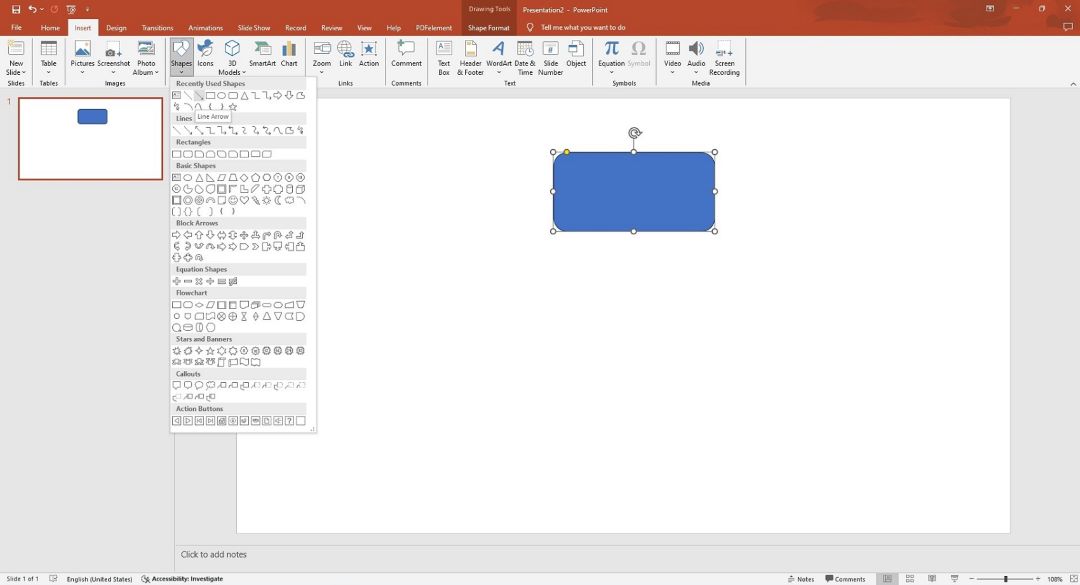
Step 3: Add Your Main Topic and Shapes for Subtopics
Type your central topic or main idea. Make sure it’s clear and concise, as this will be the foundation of your mind map. Add more shapes around the central one for subtopics. Use the same Insert > Shapes option and place them evenly around your main shape.
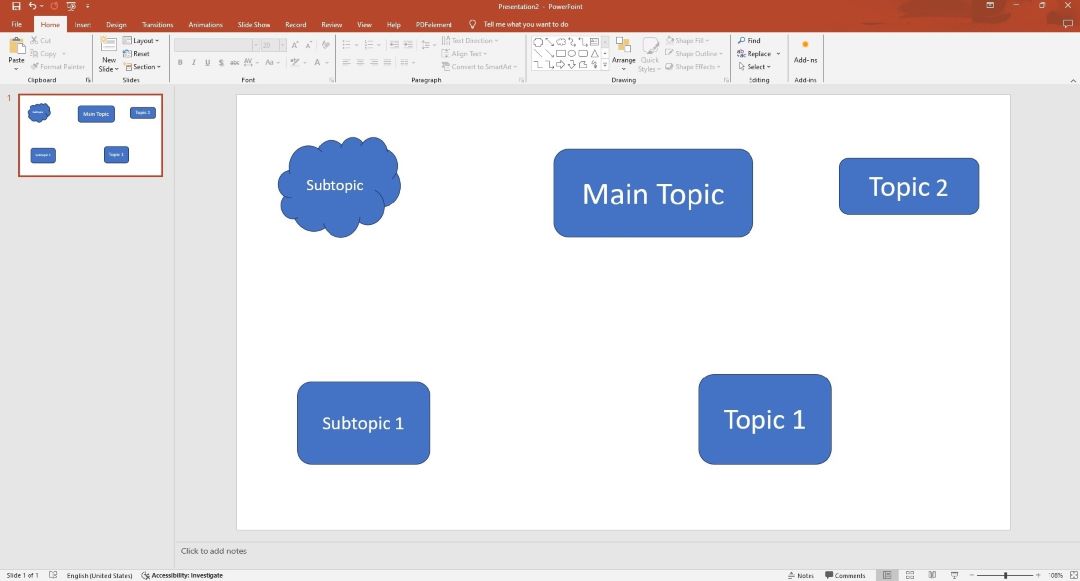
Step 4:
Use the Insert > Shapes menu again, but this time choose the Line tool. Draw lines from the central shape to the subtopic shapes to connect ideas.
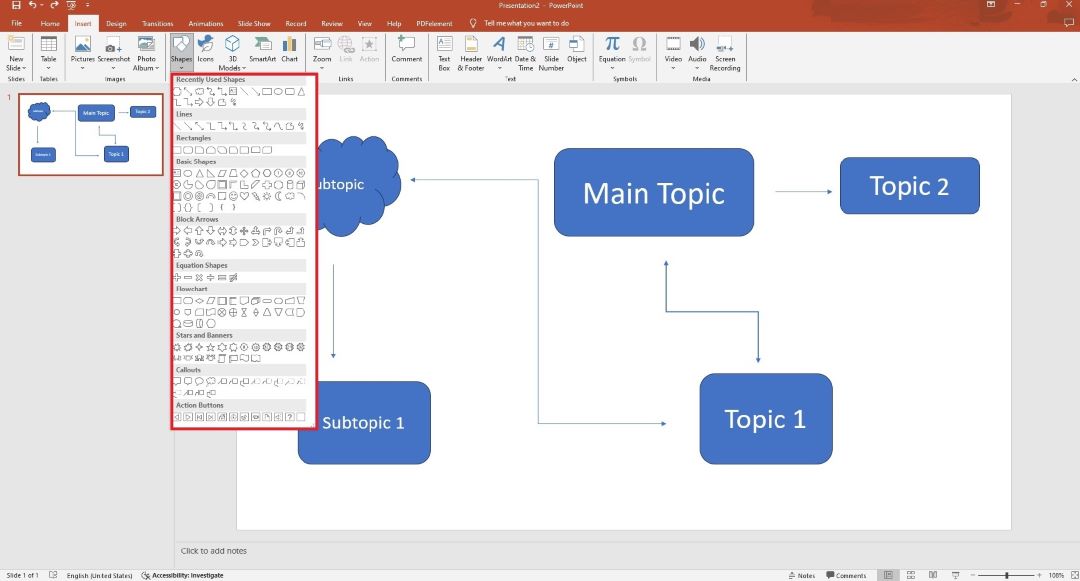
Step 5:
Type in the subtopics inside the surrounding shapes. These should represent the main branches of your mind map, breaking down your central idea.
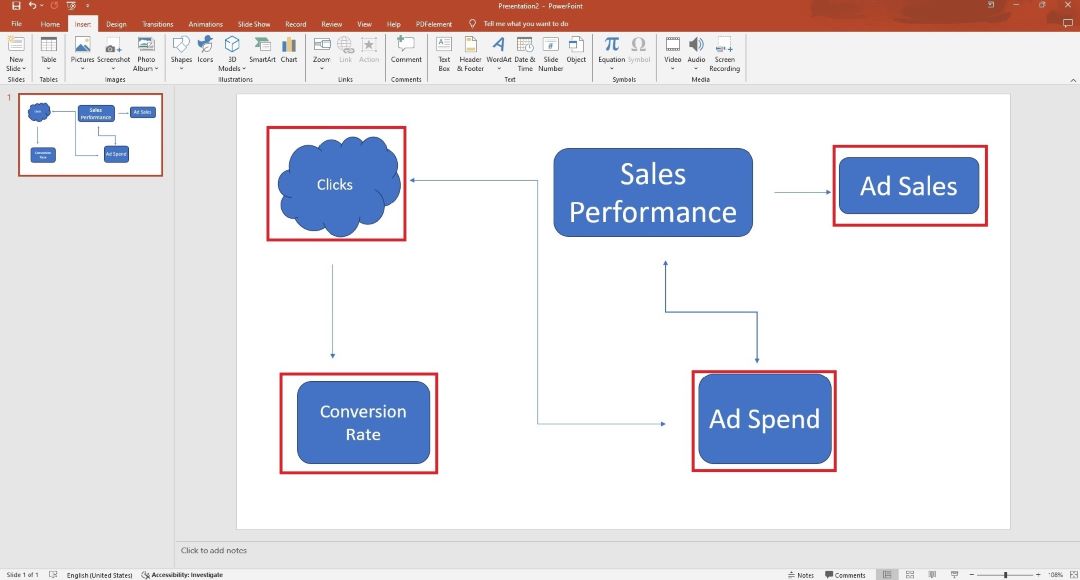
Step 6:
If you need to go deeper, add more shapes branching off from your subtopics. Use smaller shapes and more lines to build out the secondary ideas and details.
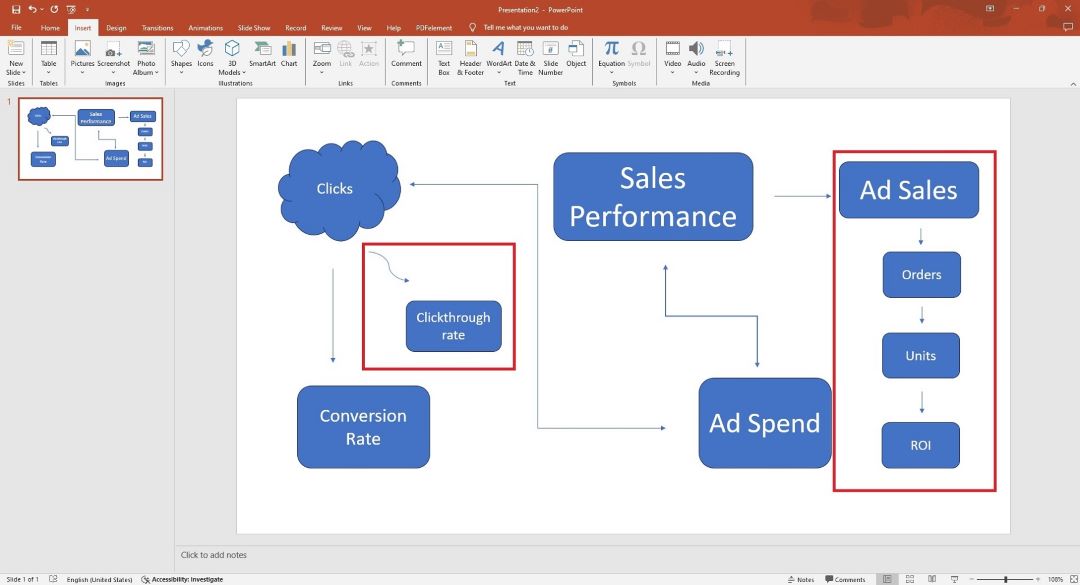
Step 7:
Select the central shape, its subtopics, and connecting lines by holding the Shift key and clicking each item. Right-click and choose Group to lock everything in place.
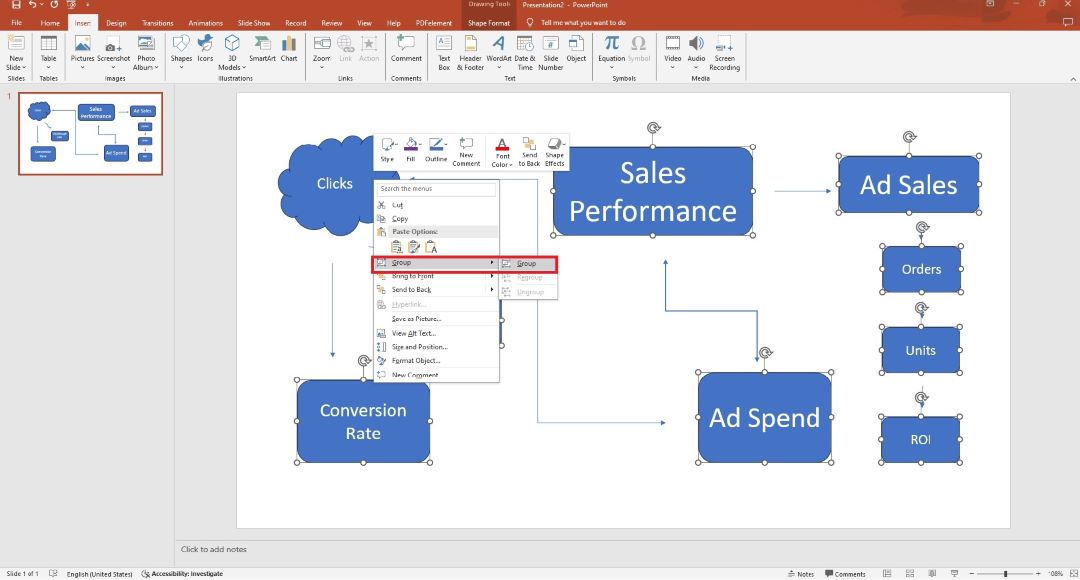
Step 8:
Use the Format tab to change the fill colors, outline colors, and text styles of your shapes and lines. Keep your design consistent and professional by choosing a cohesive color scheme.
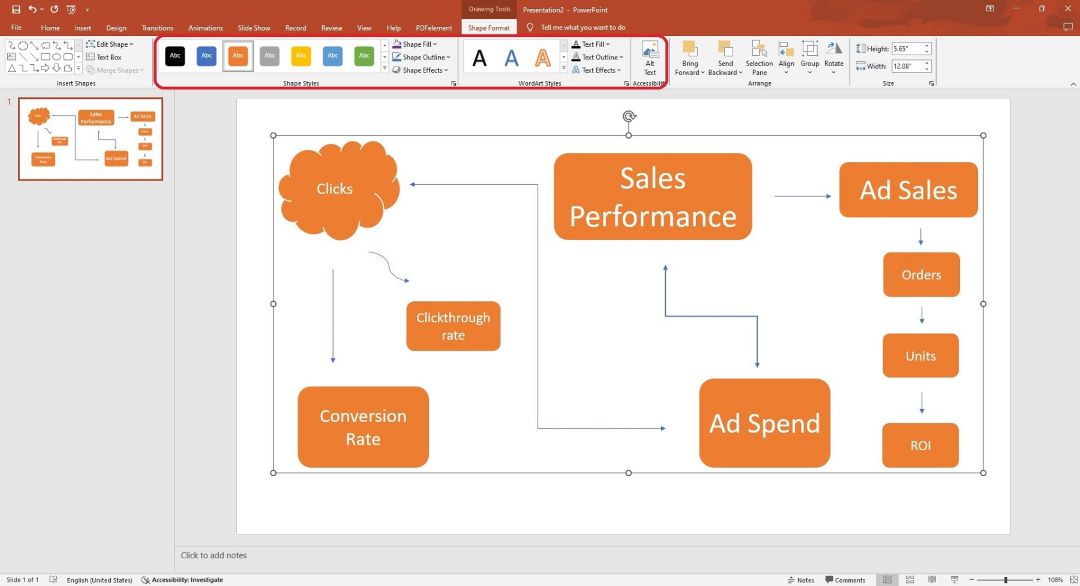
Step 9:
Use the Align options in the Format tab to ensure everything is spaced out. This will make your mind map look polished and organized.
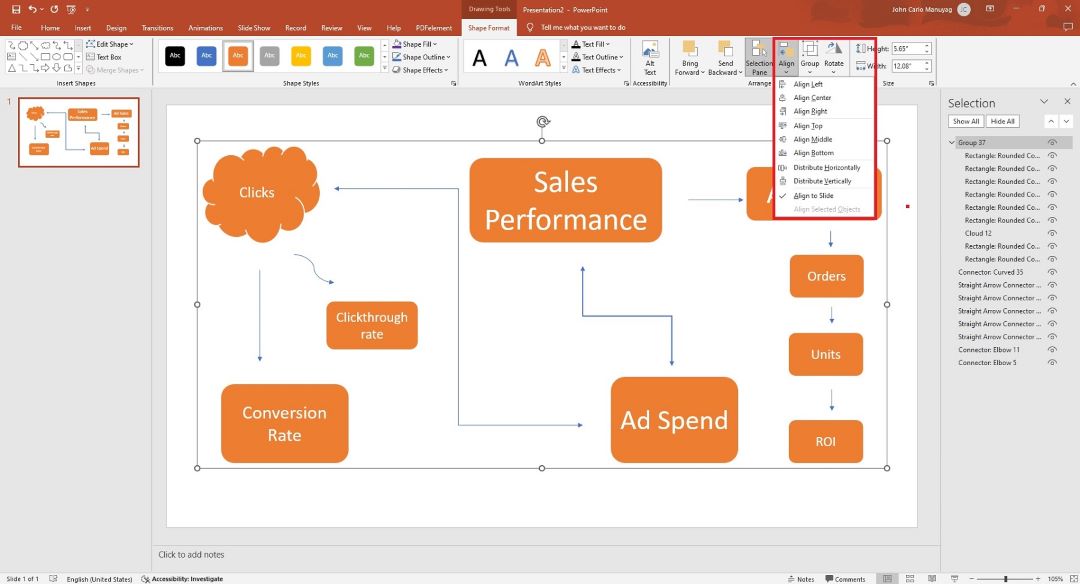
Step 10: Personalize the Mind Map
To make the mind map more engaging, you can add icons or images related to your subtopics. Go to Insert > Icons or Pictures to add visual elements that enhance your map. You can also add a background by clicking Design. Choose from the available options.
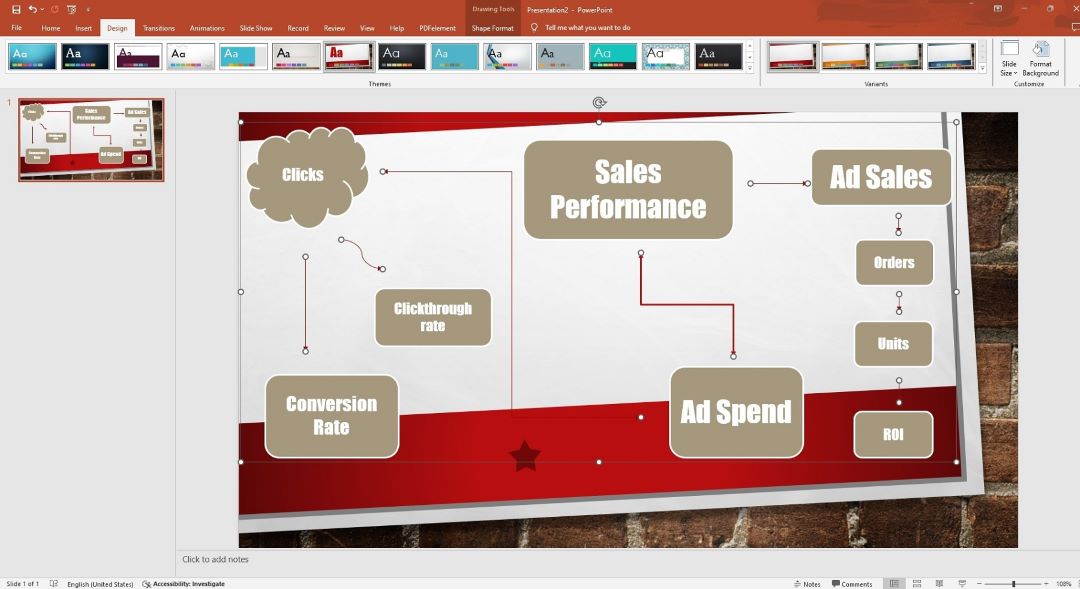
Step 11: Review Your Mind Map and Finalize
Review your mind map to make sure all connections make sense. Check for readability and make sure your color and style choices are consistent. Once satisfied, your professional mind map is complete!

How to Make a Better Mind Map With AI
Edraw.AI is an excellent tool for generating mind maps quickly with the help of AI. It simplifies the entire process by providing pre-built templates and customization options. Here’s how to get started:
Method 1: Generate a Mind Map in Edraw.AI
Step 1:
Launch Edraw.AI. Log in or sign up for a Wondershare account. Go to the AI-powered tools section and select AI Mind Map.

Step 2:
Input key points and wait for Edraw.AI to generate a mind map for you within seconds. loading="lazy" alternatively, you can use the example prompts to get started right away.

Step 3: Editing the AI-Generated Mind Map
Edit the template by clicking the text boxes to insert your ideas. Customize colors, shapes, and layout by using the right panel. For the example below, change the background to white from the original black background.
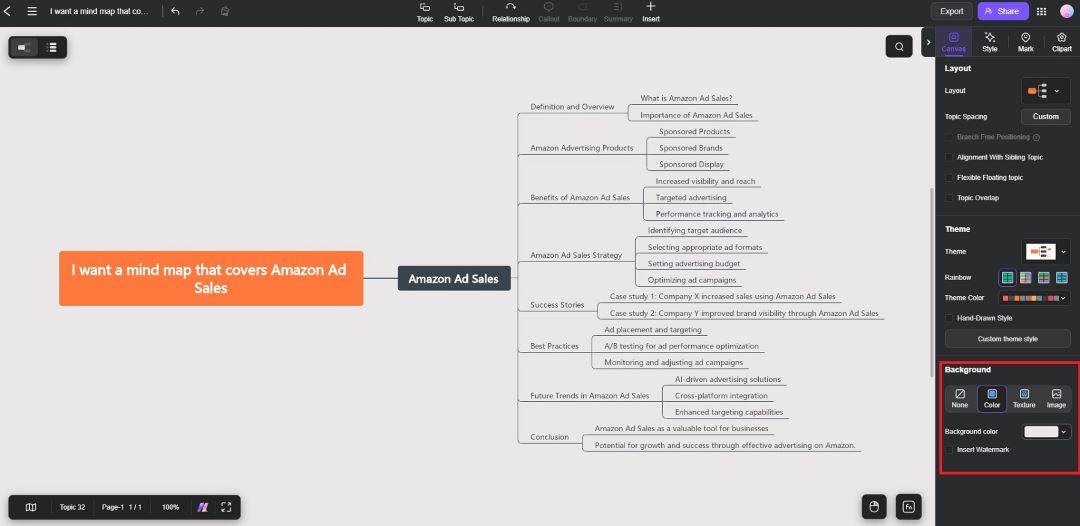
Method 2: Create a Mind Map With a Template
Edraw.AI offers pre-designed templates for various diagram types, including mind maps. Here’s how to make a mind map from one of the built-in templates:
Step 1:
Go to the Edraw.AI Templates page from the left-side navigation pane. Select Mind Map from the Diagram Type to filter the templates. Once you find one you like, click to select it.

Step 2:
Check the preview of the template, and then click Create with template to edit it.
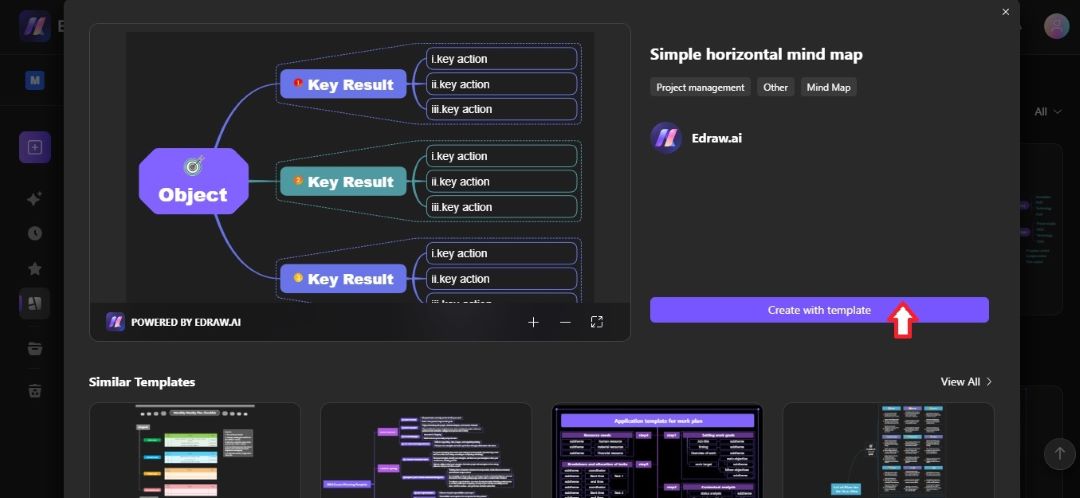
Step 3:
Edit the content of the template to create a mind map. On the right panel, go to the Canvas, Style, Mark, and Clipart tabs to customize its style and layout.
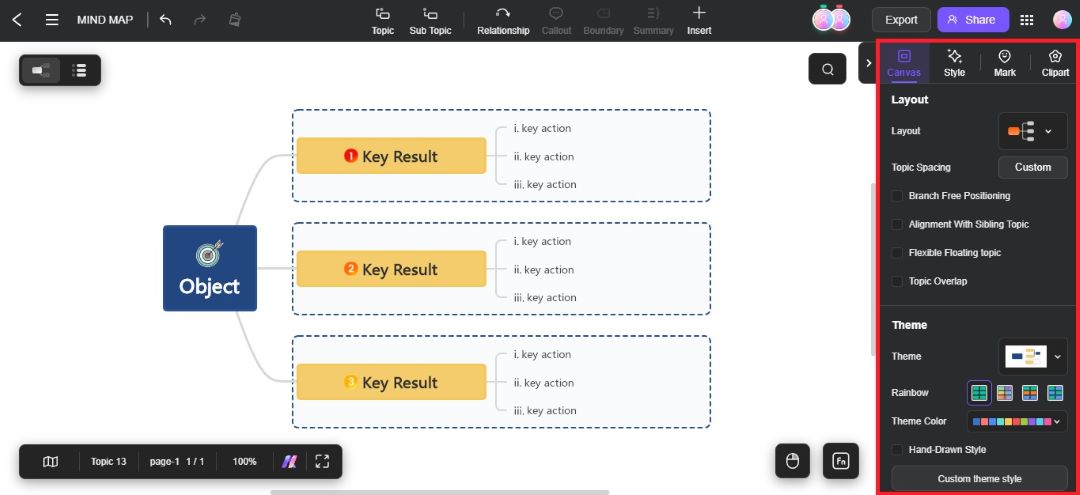
Export the Mind Map to PowerPoint
Here’s how to download the mind map and add it to a PowerPoint presentation:
Step 1:
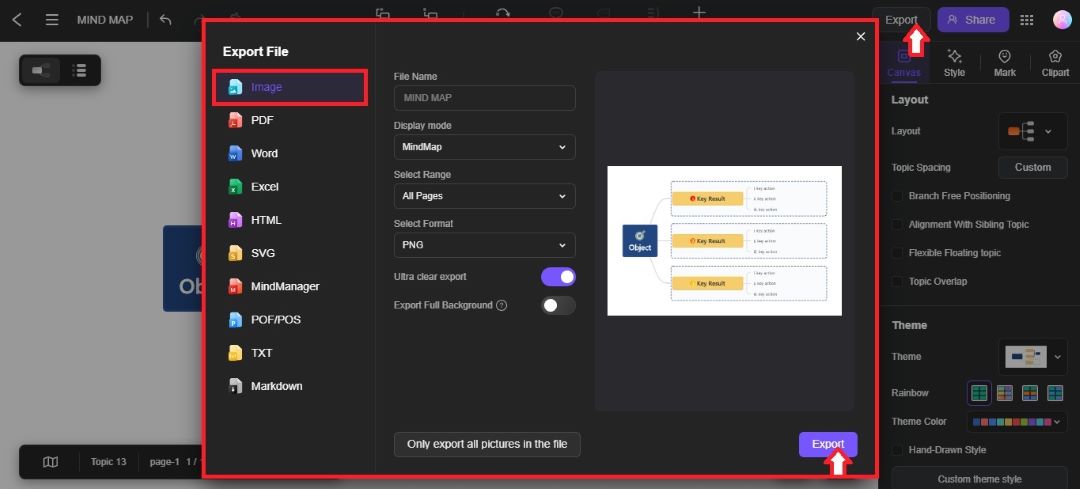
Click Export on the upper right-side navigation pane.
Step 2:
Choose PNG file format from the Select Format dropdown list. Click Export on the pop-up window to download the mind map.
Step 3:
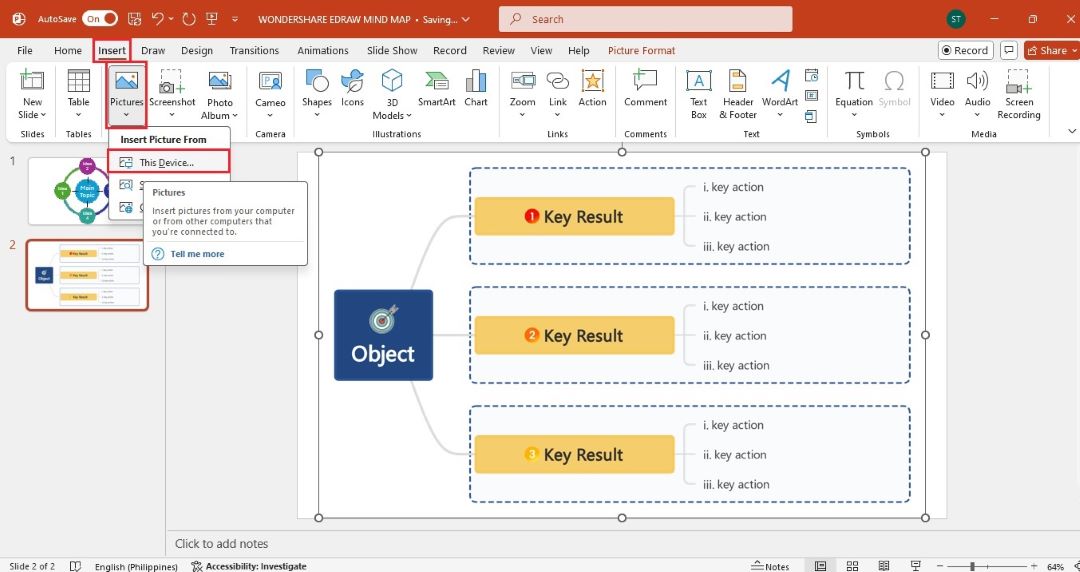
Go to the Insert tab of PowerPoint. Select This Device from the Pictures dropdown list. Import the mind map as a PNG file in PPT.
Creating a professional mind map in PowerPoint can enhance your presentations and brainstorming sessions. By following these detailed steps, you’ll ensure that your mind map is visually engaging, organized, and easy to understand. This can help you share complex ideas effectively in any setting.
Best Practices for a More Appealing and Effective Mind Map
To make your mind map not only effective but visually appealing, use:
- Consistent colors. Stick to a cohesive color scheme. Use different shades of the same color to distinguish levels of hierarchy.
- Simple fonts. Limit font variety to two at most. A clear, sans-serif font works best for readability.
- Balanced layout. Ensure that branches are evenly spaced. This improves the flow of information and enhances the visual structure.
- Use icons or images. Add small icons or images to represent key ideas, making the mind map more engaging and easier to understand.
- Limit information. Avoid overloading the map with text. Focus on key points and let the structure guide the flow.
These tips can improve both the aesthetic and functional quality of your mind map.
FAQ
-
Why is it called mind mapping?
The term mind map was popularized by the famous British Psychologist Tony Buzan. But, using diagrams that “map” your thoughts and ideas goes back centuries. Buzan promoted mind maps in his 1974 BBC TV series, where he used colorful and radiant mind maps for diagramming. -
How can I ensure my mind map looks professional?
Stick to consistent fonts and colors, align shapes neatly, and use PowerPoint’s built-in design tools to polish your mind map. -
What’s the advantage of using Edraw.AI for mind maps?
Edraw.AI provides AI-powered tools that simplify mind map creation. It offers customizable templates and an intuitive interface for both beginners and advanced users.


